4.3b · The Self-Serve MVP Stack: Build Phases

Module 4 · Step 3b of 4 · From Idea to First Paying Customer
Part 2 of 2 · Part 1: Tools & Setup covers why these three tools, what each one does, the 12 rules, communities, and the AI critic block.
Input: a Module 4 decision pointing to “self-serve” + a one-page brief + the tool knowledge from Part 1
Output: a live MVP at a staging URL real users can click - by week 10-12 for evening-only founders (the 2-4 hr/week pattern this course is built for), or by Friday week 4 for full-time founders
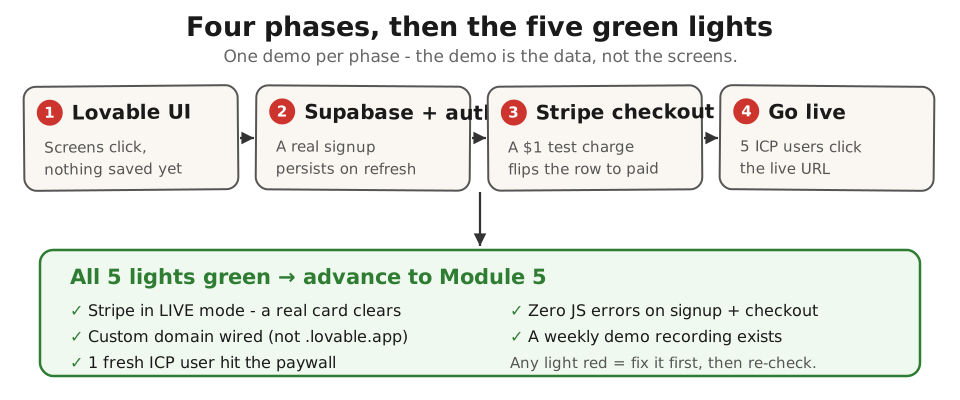
TL;DR: Four build phases with one demo each. Phase 1 ships clickable UI. Phase 2 wires Supabase auth. Phase 3 connects Stripe checkout. Phase 4 deploys to 5 ICP users. Five green lights to exit. Ship the shed, not the skyscraper.
Calendar reality for the MVP build. A full-time founder with daytime availability can hit the Phase 4 5-lights in 4-6 weeks. An evening-only founder (the 2-4 hr/week pattern this course is built for) typically needs 10-12 weeks for the same outputs. Phase 2 (Supabase wiring + RLS - Row-Level Security, the database rule that walls one customer’s data off from another’s) and Phase 3 (Stripe webhook - an automatic message Stripe sends your app when a payment lands - plus idempotency, the rule that says “if the same webhook fires twice, only act once”) are where part-time founders lose the most calendar. Plan a 10-week version of the build, not a 4-week version. The Friday-week-4 framing in the Output line above applies to full-time founders only.
This chapter assumes you read Part 1 first. Part 1 covers the $0 path, the 12 rules, what each tool does, the M2 prototype vs M4 MVP distinction, communities, and the AI critic block. The build phases below reference those concepts without re-explaining them.
The ship plan
The ship plan below is the BUILD portion only. It assumes you already ran Modules 1-3 (hypothesis → smoke test → 10 interviews → one-page brief) and read Part 1: Tools & Setup. If you skip straight here without validation, the build often ships into the silence Modules 1-3 were designed to prevent.
Four build phases, plus an onramp phase that hands you off to Module 5. Each phase ends with one demo to one human (a friend, an advisor, your spouse, the dog if necessary - someone who has not seen the build). The build phase ends with five real ICP users on the staging URL; the onramp phase brings the rest of your Ch 2.3 (a + b) interview pool onto the product.
- Phase 1 - Lovable, the UI. No backend yet. Demo: screens click, no data persists.
- Phase 2 - Supabase + auth. Real signup works. Demo: your spouse signs up, a row appears in Supabase in real time.
- Phase 3 - Stripe + checkout. $1 test transactions. Demo: you sign up as a fake coach, pay $1, the webhook flips your row to paid.
- Phase 4 - staging URL + 5 ICP users. Custom domain, Stripe live. Right after: 5 click sessions logged - iterate from real signal.
- Onramp phase - Module 5 handoff. Invite the 10 Ch 2.3 (a + b) interviewees by name (covered in detail below). Hand off to Module 5 with a populated users table, not an empty one.
Phase 1 - write your prompts, set up Lovable, ship the UI
Start by opening the one-page brief. The “what you’re building” section becomes your first three Lovable prompts.
Bridge from Ch 2.4 vocabulary (the most useful paste in the course). Before you describe a button label, a column header, or a screen title, open your Ch 2.4 vocabulary doc (the verbatim words your 5 prototype subjects used in the closing “describe in one sentence” question). If 4 of 5 said “match” and not “reconcile,” the button label is “Match transactions,” not “Reconcile.” If 3 of 5 said “client” and 2 said “patient,” use the most-repeated term. The vocabulary your prototype subjects passed is the only user-tested language you have; the production MVP is the one place where using it has revenue consequences.
Lovable’s prompt style is conversational; you describe the screen, the components, the rough behavior. Examples:
Build a dashboard for a fitness coach. Top-level view shows
a list of clients (name, last check-in date, status: green
if checked in this week, red if not). Click a client to open
their detail page with a check-in form (date, weight, notes,
3-photo upload).
Lovable generates the screens. You iterate by chatting with it: “make the status badges bigger, move the check-in form to the right side.” By the end of the phase you have a clickable UI on a public staging URL. No data persists yet. That is fine. The phase demo is to your spouse: do the screens make sense without any explanation? If the screens need a tour to understand, the design is wrong, not the build. Rewrite the prompts.
Phase 2 - set up Supabase, connect, real signup works
Create a Supabase project on the free tier. Define your three or four core tables in the SQL editor (or in the Table Editor UI; both work for an MVP). For the fitness coach example: coaches, clients, check_ins. Enable Row-Level Security from the start. RLS is the difference between a coach seeing their own clients and a coach seeing every coach’s clients in a single bug. Skipping it is the most common security mistake we see in vibe-coded MVPs.
First-table walkthrough (for the fitness-coach example - adapt to your domain): in Supabase Dashboard, click Table Editor in the left sidebar, then New table. Name it
coaches. Check the “Enable Row Level Security (RLS)” box BEFORE adding columns. Add columns:id(uuid, primary key, defaultgen_random_uuid()),user_id(uuid, foreign key toauth.users.id),created_at(timestamp, defaultnow()). Click Save. Repeat for your second and third tables. The RLS checkbox is the load-bearing click - if you forget it on table creation, you’ll have to manually enable it later AND backfill policies on existing rows.
In Lovable, install the Supabase integration. Lovable will add the Supabase JS client and store the keys for you. Wire your signup screen to supabase.auth.signUp() and your data screens to supabase.from('clients').select(). The phase demo: your spouse signs up via the staging URL, you watch a row appear in the Supabase console in real time.
Self-test your RLS policy before going live (two paths).
No-code path (default for Sam). In Claude or ChatGPT, paste: “Audit my Supabase RLS policy. Here is my schema: [paste your table definitions from Supabase Table Editor]. Here is my current RLS policy: [paste from Authentication -> Policies]. Tell me whether a logged-in user with a fake user-id can read rows that belong to other users. If yes, give me the exact policy SQL to fix it.” Paste the AI’s suggested policy into Supabase Authentication -> Policies.
SQL path (only if you are comfortable writing SQL). In Supabase Dashboard -> SQL Editor, paste the test below, replacing
<table>with your main user-data table. The pretend user-id999has no real rows; if the query returns any, your policy has a hole.SET ROLE authenticated; SET request.jwt.claims = '{"sub": "00000000-0000-0000-0000-000000000999"}'; SELECT * FROM <table>; RESET ROLE;Zero rows back = policy works. Any rows back = the policy is missing a
USING (auth.uid() = user_id)clause or equivalent. Fix before any real user touches the URL.
End-of-Phase-2 micro-fail signal. Before you build Stripe in Phase 3, hand the staging URL to your spouse OR one of your Ch 2.3 (a + b) Mom Test interviewees. Give zero coaching. Watch them try to sign up and reach the core action button (logging a check-in, exporting the CSV, whatever your one-page brief named as the workflow). If 2+ test users stall on screens 1-2, the workflow shape is wrong - pivot back to Ch 3.2 outcome rewrite before adding Stripe. Building a payment wall on top of a workflow nobody can navigate just adds friction to a broken loop.
Phase 3 - add Stripe, wire checkout, $1 test transactions
Create a Stripe account in test mode. Build one product (your monthly plan) at one price (the price your one-page brief locked in). Use Stripe Checkout for the simplest possible integration: one URL Lovable links to, one webhook (a webhook is an automatic message Stripe sends your app the moment a payment succeeds - you don’t write code to call Stripe; Stripe calls you) back to Supabase that flips the coaches.subscription_status column to active when the charge clears.
Spend the rest of the phase running $1 test transactions through the flow: signup, hit the paywall, pay $1 in test mode, land in the paid view. Use Stripe’s test card numbers to simulate failures (declined card, 3D Secure challenge, dispute). The phase demo is to yourself: you sign up as a fake coach, you pay $1, you land on the paid dashboard, you check Supabase, the row says paid. Webhook works.
Phase 4 - deploy, send to 5 ICP users, iterate from the data
Switch Stripe out of test mode. Buy a domain (~$10/year on Porkbun - .com registration is $9.73 first year, $10.91 renewal as of 2026 - or your registrar of choice; never let a tool hold your domain). Point the domain at the Lovable staging URL. Take final screenshots, write a 3-line cold email or LinkedIn DM, and send to 5 ICP prospects from your Module 2 outreach list.
“Hey [name] - the workflow you described recently (logging client check-ins by hand on a spreadsheet) is now a tool. Quick first-use, $29/month after a trial window. URL: [staging URL]. Honest reactions only.”
Watch what happens. If 0 of 5 click, the cold message is wrong, not the product (yet). If 5 click and 0 sign up, the landing screen is wrong, not the product. If 5 sign up and 0 pay, the paywall position or the price is wrong. Each failure shape tells you what to fix next. The demo is the data, not the screens.
Phase 4 exit criteria: the MVP is “done” only when ALL 5 lights are green. Without these, you either polish indefinitely in Lovable or hand Module 5 an MVP that real users cannot touch.
- Stripe in LIVE mode (not test mode) and a real card successfully clears the paywall at least once.
- Custom domain wired (not a
.lovable.appsubdomain) - the URL you DM to a user must be yours.- At least 1 ICP user who was NOT in your Ch 2.3 (a + b) interviews has clicked through to the paywall on the live URL.
- Zero JS errors in the browser Console on the sign-up + checkout flow (open DevTools, walk the happy path, console must stay clean).
- Friday-style weekly demo recording exists for the last week of build (a Loom or screen-record proving the demo cadence held to the end).
Advance to Module 5 only when all 5 are green. If any are red, the MVP is NOT ready for the 10-30 users Module 5 needs as input. Fix the red light first, then re-check.
Pre-flight before M5.1: book up to 10 user sessions. Phase 4’s 4-6 onramp accounts are not enough for M5.1’s Sean Ellis 40% test (under 10 respondents = noise, not signal). Before you start Module 5, book a second small invite wave: 5-10 more sessions from your Ch 2.3 (a + b) interviewee list, your community connections, or a fresh micro-batch of cold DMs. Aim for 10-15 active users total by the time M5.1’s survey ships. Without this pre-flight, you will run the 40% test on 5 people, get an ambiguous result, and falsely conclude you have a product problem when you really have a sample-size problem.
Onramp phase - Module 5 handoff: invite your Module 2 interviewees onto the live MVP
The build phases above are the BUILD container. The onramp phase is the Module-5 handoff - the step that turns a live staging URL into a live users table. The five cold prospects from Phase 4 are the demand-signal check. The 10 interviewees you ran through Ch 2.3 (a + b) are the warm pool that becomes your first real users - the ones who told you the problem was real, in their own words, recently. They are not on your MVP yet. They will not show up unless you invite them by name.
Open your Ch 2.3 (a + b) interview list. For each of the 10 names, write a 3-line personalized note: the workaround they described in their interview, the staging URL of the workflow that now replaces it, and one specific question they answered that the MVP now responds to.
Send it as a Loom (Loom is a free short-form screen-recording tool - the recipient watches you click through the product in their browser, no install) or a personal LinkedIn DM, not a generic email blast.
Expect 4-6 of the 10 to create accounts; 2-3 of those to actually log in and click around; 1-2 to become candidates for the Ch 5.1 Sean Ellis 40% survey once you have 10-30 users total. “Create an account” is not “pay” - paid conversion happens in Module 5.
This is the step that closes the gap between Module 4 (MVP shipped) and Module 5 (first paying customer). Without it, you ship a working URL into the silence of a Supabase users table with zero rows. The Module 2 interviewees are the closest 10 people in the world to your ICP - they spent 30 minutes telling you their version of the problem. Inviting them by name is the cheapest first-10-users acquisition the course will name.
If you need more than 10 users on the MVP before running Ch 5.1’s survey, the recruitment playbook in Ch 2.3 (a + b) is the same one you use to find them - the message changes from “30 minutes of your time” to “try the live tool for a week, free.”
What “ship the shed” means in practice
The Module 4 post walked through Rob Walling’s shed-vs-skyscraper warning: you build the smallest structure that does the job, and you do not pour skyscraper foundations for it. Lovable + Supabase + Stripe is the shed.
| Inside the envelope | Outside the envelope |
|---|---|
| One workflow, one persona, one happy path | Multiple parallel workflows or personas |
| Database fits on one Supabase project | Complex data model needing sharding |
| No real-time features | Real-time multiplayer or live updates |
| No compliance scope | Regulated industry (healthcare, finance, PII) |
| AI inference costs pennies per request | AI inference at scale (daily cost >$10) |
| Three core integrations (Lovable/Supabase/Stripe) | Many third-party APIs beyond the three |
Be honest about the trade-off. This stack cannot host every business. It can host yours through the first 10 paying customers, which is the only data point that earns you the right to argue about the next architecture.
The architectural ceiling - what’s coming in Chapter 4.4
The stack holds until it doesn’t. Five specific signals tell you the ceiling is close. The next chapter (Chapter 4.4 - Proactive Ceiling Signals) walks through each one with the threshold to watch.
Quick preview: scale beyond roughly 10,000 users, complex data model that no longer fits a single Supabase project, real-time features the auto-generated REST API cannot serve, security or compliance scope that needs an external audit, AI inference at scale where per-request cost crosses pennies. When you see two of these, route to the hire-track supplementary reference or to a Fractional CTO for the architecture call. Architecture does not collapse overnight; the warning shows up in the metrics before the customer sees it. Chapter 4.4 names the metrics.
What the stack actually costs, per published vendor pricing:
| Phase | Cost shape | Line items |
|---|---|---|
| Start | Free tiers | Free tiers across Lovable, Supabase, Stripe, GitHub |
| First ship | Per-tool monthly fees | Lovable Pro $25 + Supabase Pro $25 + Porkbun .com ~$10/yr + Resend $20 + Stripe 2.9% + $0.30 per transaction |
| Post-launch | Scale-tier monthly fees | Lovable Scale $100 + Supabase Pro $25 + Resend $35 + Sentry $26 + monitoring $14 |
The architectural ceiling tends to land at the post-launch tier - at ~10K users, route to Chapter 4.4 or a Fractional CTO. A hire-a-team build is material monthly burn before revenue; this stack ships the same first 10 paying customers on a fraction of that.
What to do tomorrow
Three actions, in order. The first two cost $0.
Sign up for Lovable + Supabase free tiers on lovable.dev and supabase.com (Google sign-in). Connect GitHub sync inside Lovable so your code survives subscription cancellation.
Pick ONE feature from your one-page brief’s “what you’re building” section. Not three. One. The smallest workflow that solves the validated problem for one persona. Write: “build a [screen] for [persona] to [outcome].”
Generate the UI in Lovable. Iterate by chatting: rename, resize, reposition. End-of-phase demo: screens click with nothing persisted. Show one human who hasn’t read the PRD - watch them try it without a tour.
The Self-Serve Stack Walkthrough artifact is the day-by-day version of this post. Print it before Phase 1. Each day has one small task; each phase has one demo. The artifact removes the “what do I do next” question, which is the reason most small ships actually finish.
Skip the build phases and try to design the perfect first version, and months later you are the one posting in the salvage-or-rebuild thread about a 12,000-line vibe-coded codebase that grew faster than the architecture could hold.
The shed build never grows that large. Either you reach the architectural ceiling on real users (good problem), or you learn the demand is not there (cheap problem). Both outcomes beat the half-built thing.
When this path ends
Self-serve has a ceiling. The ceiling-signal monitoring chapter covers the 5 signals that mean it’s time to bring in help. When 2+ signals fire in one monthly check, switch to the hire-track supplementary reference.
Build the shed first. Lovable + Supabase + Stripe + a $14 domain ships your validated problem to a staging URL on per-vendor pricing. The bigger architecture is a different conversation, and you have not earned the right to have it yet.
Further reading
- Part 1: Tools & Setup - the companion page: why these three tools, what each one does, 12 rules, communities, and the AI critic block
- Self-Serve Stack Walkthrough - day-by-day version of the build plan; print before Phase 1
- Y Combinator, Startup School Library + 2026 Founder Resources - the YC stance on validating without code
- Rob Walling, Vibe Coding interview on Creator Science - the shed vs skyscraper analogy
- Lovable, Pricing tiers and community Discord
- Supabase, Row-Level Security guide
- Stripe, Checkout quickstart and Pricing page
- Drew Falkman, Vibe Coding Data-Enabled AI Apps on Maven
Done when: All 5 green lights are lit: Stripe in live mode, custom domain wired, 1 ICP user tested the paywall, zero JS errors on the signup+checkout flow, and a weekly demo recording exists.
Founder OS · Artifact #5 of 6: A live MVP at a real URL, with ownership of every account in your name (per Ch 4.2’s Day-1 ownership audit). Save the URL + admin login + the latest weekly demo recording in a
Live MVPdoc in yourFounder OSfolder. Module 5 invites your Module 2 interviewees + smoke-test email list to this URL as the warm seed for the first 10-30 users.Next click: 4.4 · Vibe Coding Done Right: 5 Ceiling Signals
If blocked: If stuck on Phase 2 (Supabase), post your schema in the Lovable Discord. If stuck on Phase 3 (Stripe webhook), run a $1 test transaction in Stripe test mode first. The communities section in Part 1 lists free help channels.
Case Study: Tomas & Mia
Tomas: Phase 1-3 (6 weeks total with CTO): builds reconciliation dashboard, CTO sets up RLS + Stripe subscriptions + QuickBooks API via n8n. Phase 4: ships to custom domain. 5 green lights passed.
Mia: Phase 1-3 (4 weeks total): builds tutor search + profiles, sets up parent/tutor login, integrates Stripe booking payments. Phase 4: ships to custom domain. 5 green lights passed.
Built by JetThoughts as part of the From Idea to First Paying Customer curriculum.