In this module
Module 1 · Lesson 1.5 · [CORE] · From Idea to First Paying Customer
Input: a live smoke-test landing page from Lesson 1.4
Output: a price hypothesis with a measured click-to-payment signal
Progress: M1 · 5 of 5
Your smoke test collected emails, and an email signup only tells you a stranger found the idea interesting. Whether they’d pay for it is a separate question - a person typing card details is making a different decision than a person typing an email address. This lesson adds a Stripe button so you can measure that second decision.
Set your price hypothesis #
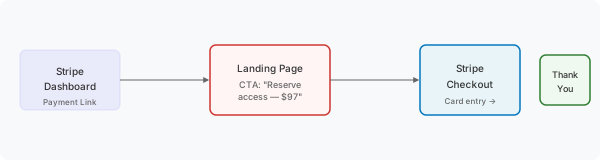
A Stripe Payment Link is a hosted checkout URL you generate from your Stripe dashboard - no code, no integration. You paste the link on your landing page. Stripe hosts the checkout. Strangers who click through and enter card details produce a payment intent - the strongest demand signal a pre-product page can generate.
Your price hypothesis needs three parts:
| Part | What it is | Example |
|---|---|---|
| Number | A specific dollar amount, not “affordable” | $49, not “premium” |
| Unit | Per month, per user, or one-time | $49/month, not $49 |
| Framing | Early-access or founding-member rate | “Founding member - $49/month for life” |
Default price anchor: if your product replaces manual work, price it against the time it saves - a tool that saves someone 4 hours a month is worth a meaningful fraction of what those hours cost them. Not sure? Spend 10 minutes finding what 2-3 existing tools in your category charge, and start at their middle tier. The number is a hypothesis like everything else here - you’ll refine it after Module 2 interviews.
Write the button copy #
The copy matters more than the price number. Two framings we keep reaching for on pre-product pages:
- Outcome framing: “Stop spending 4 hours on reconciliation - $97” (anchors price to the problem it replaces)
- Risk-reduction framing: “Reserve your spot - $97 refundable for 30 days” (reduces first-touch risk)
Pick one pattern. Do not A/B test - 150 visits each on a $300 budget can’t distinguish 4% from 5%. Ship one button copy.
Add the Stripe button #
Price:
- Start Stripe verification tonight. Sign up at stripe.com. Stripe needs your bank account + tax ID before accepting live payments - usually 1-3 business days. Start the weekend before launch.
- Create a Payment Link. Dashboard → Payments → Payment Links → New link. Add a one-time product at your hypothesis price. Use one-time (not subscription) - “founding member” converts better on a pre-product page.
- Set the after-payment redirect. Skip it if you’re in a hurry (Stripe shows its own confirmation). Set it if you want GA4 (the Google Analytics tracker you installed in Lesson 1.3) to count payment completions as page views: Mixo - redirect to your main page URL (GA4 counts the revisit; rougher but works). Carrd - create a hidden section at the bottom, redirect to its anchor URL (
yourpage.carrd.co/#thanks). Other builders: redirect to any page or anchor on your site that GA4 can register.- Add a refund line in your page footer (not the Stripe checkout footer): “Full refund within 30 days if we don’t ship.” Standard pre-order disclosure - it keeps the offer honest and lowers click friction. (US readers: this is the FTC-friendly pattern; selling elsewhere, check your local pre-order rules.)
- Paste the Payment Link URL on your CTA button. Below it, smaller text: “Not ready? Join the waitlist instead.”
- Success check: your Stripe dashboard shows live-mode (not test-mode) and the button opens a real checkout page.
While Stripe verifies #
Verification takes 1-3 business days, and live payments won’t work until it clears. You don’t have to sit idle - build the whole button in test mode now, so the day Stripe clears you paste one link and launch.
Stripe’s test mode is on the moment you sign up. Create the Payment Link (step 2), wire the after-payment redirect (step 3), and run a test checkout on yourself with Stripe’s test card 4242 4242 4242 4242 - it walks the full flow without charging anything. Add the refund line to your footer while you’re in there, and everything but the live link is done.
Come back when Stripe emails you that your account is activated - the dashboard’s “activate your account” prompt disappears. Switch the link to live mode, paste the live URL on your button, and re-run one checkout to confirm it charges for real.
If Stripe or checkout stalls #
If this fails: Stripe verification takes more than 3 days.
- Why: Stripe sometimes requests an ID upload for first-time accounts.
- Fix: build the page without the button. Run the email-only smoke test from 1.4 while Stripe processes. The demand signal doesn’t depend on the price button being live today.
If this fails: visitors click the button but nobody completes payment.
- Why: the checkout page is killing intent - price felt different in context, or the checkout page itself adds friction.
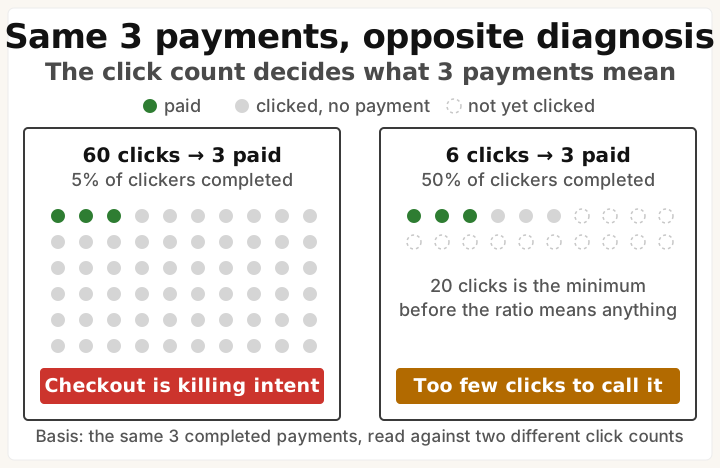
- Fix: track both click (page → Stripe) and completion (Stripe → thank-you). 60 clicks with 3 completions = the checkout is killing intent. 6 clicks with 3 completions = half of clickers bought - promising, but 6 clicks is too small a sample to call; keep the test running until you have 20+ clicks before trusting the ratio. Same completion count, opposite diagnosis. The full price test guide has the detailed threshold table.
Open your Stripe dashboard. Write down the number of clicks vs. completed payments. Which number is lower than you expected? That gap is your pricing research question for Module 2 interviews.
Done: Stripe Payment Link is live on your smoke-test page and you have a measured click-to-payment rate.
You have now: all M1 artifacts - Founding Hypothesis (1.1), clear landing page (1.2), tracking (1.3), cold-traffic data (1.4), price signal (1.5). Module 1 closes here.
Next: 2.1 · The Mom Test: Ask About the Past, Not the Future - the interview method for finding out whether the problem behind your hypothesis is real. You’ll ask strangers about their past, not pitch your idea or your price.
If blocked: see “If this fails” above. Missing any M1 artifact? Go back to that lesson before starting Module 2.
What M1 cost you: mostly your ad spend - $250-700 on Meta for the 1.4 demand test, plus whatever you spent keeping ads running during this price test. Reddit runs higher per the channel guide; LinkedIn B2B runs $1,650-6,600. If you used the guide’s $0 organic path, your cost was $0.
Deeper reference: Full Stripe setup walkthrough + pricing revisit moments + threshold bands
Variant: Fake-Stripe Pre-Sale (Pieter Levels style) - a $1 refundable charge instead of a waitlist button, when you want the strongest pre-product demand signal. Includes refund and FTC compliance notes.
Module 1 closes here. Before opening Module 2, you should have: (1) a founding hypothesis scored 14+/20 across the four lenses (Lesson 1.1), (2) a live smoke-test page that passed the one-stranger clarity test (Lesson 1.2), (3) Clarity + GA4 tracking installed and verified (Lesson 1.3), (4) a go / iterate / kill read from 300 cold visitors (Lesson 1.4), and (5) a Stripe Payment Link live with a measured click-to-payment rate (this lesson). All five in your
Founder OSfolder. Missing one? Go back - Module 2 interviews ask real people about the hypothesis and price you just tested; walking in without a finished artifact means asking about a guess instead of a measured signal.
See it in action: Module 1 walkthrough: Mia builds TutorMatch
Built by JetThoughts as part of the From Idea to First Paying Customer free curriculum.