Simplest step by step guide creating a post

For novice authors who are going to share their thoughts with public through the posts, we highlighted the recommendations and the stages for starting to write.
Think up a title #
Every post has a **title. **A thing that indicates what the article is about and distinguishes it from other articles. After making a research about a thing you want to describe you need to think about the title of your own post. For this, compose a few variants, about 4–5 and try to find one that matches best.
A good JTWay post title has the five following characteristics:
Recognizability — The title is a name of the subject that someone familiar with, although not necessarily an expert in, the subject area will recognize.
Naturalness — The title is one that readers are likely to look or search for and that editors would naturally use to link to the article from other articles.
Precision — The title uniquely identifies the article’s subject and distinguishes it from other subjects.
Conciseness — The title is no longer than necessary to identify the article’s subject and distinguish it from other subjects. The length of the title is no longer than 45 symbols.
Consistency — The title is consistent with the pattern of similar articles’ titles.
[EXAMPLE] I’m writing an article about a working day at JetThoughts, and want to give a title based on the suggestions above:
How we work in JetThoughts
A typical day at JetThoughts
Our Workflow in JetThoughts
Working process in JetThoughts
I chose the second one, but the others were good enough. The main idea is to show a thought process called brainstorm to create possible and good fit cases and after take one that would match better than the others.
Choose a photo #
A photo is a second important thing your article will be associated. It will be displayed on social networks post preview(Twitter, LinkedIn, Facebook), must have great quality and some interesting meaning. The preferable size for harmonious appearance of the photo is 1600 x 530 px.
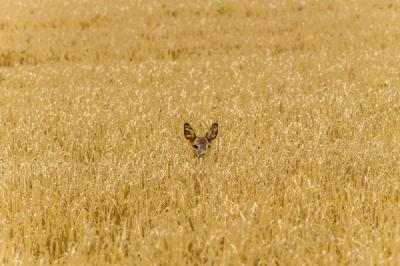
[EXAMPLE] I worked on an article about auto collapsing files when reviewing PR. And I found that it would be nice when I find a picture with something that tries to hide.

As you can see a fawn hides behind wheat.
This trick creates an association between the author’s theme and article content as well.
Also, don’t forget to add copyright to a photo. We use Unsplash to get free high-resolution photos.
Split into sections #
You need to divide your big theme, into small pieces. Each article is unique. But here is a good example of a good partition.
[EXAMPLE] We have an article about automating delivery of React Native Application:
Introduction
Instruction Plan
Add Configuration to Allow Releases to be Run on Real Devices
Setup Application Distribution
Automatize Build and Distributions of Application
Conclusion
As you can notice, an algorithm is the same as when you think up a title. The main idea is to show creativity and brainstorm :)
Add content #
After splitting an article into sections you need to add some content to them and ask for review your mentor. It is also an individual task. So, pay attention to it.
[EXAMPLE] We have an article about cleaning Rails views:
Why is logic in views a bad idea?
The main reason not to put the complex logic into your views is, of course, testing. I don’t want to say that it is impossible to test logic defined in views, but it is much more complicated. And, as a very lazy person, I don’t like doing extra work …
Footer #
Each article has a footer part which includes your name and external links.
[EXAMPLE] At the end of this article, you can find a texted template:

Paul Keen is an Open Source Contributor and a Chief Technology Officer at JetThoughts . Follow him on LinkedIn or GitHub .
If you enjoyed this story, we recommend reading our latest tech stories and trending tech stories .